How to bedazzle a tumbler or bottle exterior
Start with a small decorative accent on a known exterior finish. Keep the rim, lid, threads, drinking opening and food-contact surfaces undecorated.
Planning guidance, not a hands-on product test. Check the exact material, stone backing and manufacturer instructions before starting.
Check the actual finish
Stainless steel is not a complete description of the surface: the outside may be painted, powder-coated, wrapped or otherwise treated. Identify that finish before selecting an adhesive. Do not assume an adhesive that lists metal will also bond every painted metal bottle. A disposable-looking plastic cup and an insulated metal tumbler are different projects.
Plan an accent, not full coverage
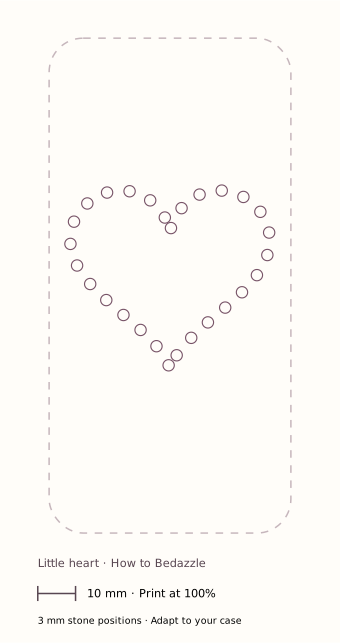
A small freestanding heart gives you room to work around the curve. The heart pattern uses 28 positions for 3 mm stones; prepare 31 for a single color with 10% spare allowance. On a curved surface, treat the print as a visual reference rather than proof that a flat transfer fits perfectly. You need a compatible adhesive, tray, pickup tool and stable cradle.
1. Set no-decoration zones
Mark the intended boundaries on a paper plan, not with permanent ink on the cup. Leave the top contact area, lid interfaces, threads, handles, seals and base clear. Keep stones out of areas gripped tightly or rubbed by cup holders. This guide does not claim that any adhesive or rhinestone is food-safe.
2. Clean without damaging the coating
Follow the container manufacturer’s cleaning guidance and let the outside dry. Do not sand away a coating or use aggressive solvents on an unknown finish. If the surface is worn, peeling or soft, do not decorate over it and expect the bond to be stronger than that coating.
3. Make a compatibility sample
Use a representative spare surface where possible, or a hidden area only if that is acceptable for your item. Test the exact stone backing, adhesive and finish. Allow full cure and inspect the coating as well as the bond. If a stone removes the paint when it lifts, the coating is part of the failure.
4. Dry-fit a narrow section
Set the empty container in a stable cradle without loading the lid or drinking edge. Arrange the heart in a small visible working area. Keep the stone backs seated against the curve; larger stones can bridge a small-radius surface. Adjust or reduce the motif if they rock instead of lying evenly.
5. Work in sections and prevent sliding
Use the adhesive’s specified application method. Keep the current section facing upward while it sets as directed. Do not rotate wet work downward or add a large area that slides before you can place it. If the process requires temporary support, use only a release material compatible with the adhesive.
6. Cure and inspect before handling
Wait for full labeled cure, then inspect all stones and the surrounding finish. Do not put adhesive, resin or loose stones inside the container. Decoration does not establish dishwasher, microwave, heat or long-term water resistance.
Care is a compatibility question too
Follow the container’s and adhesive’s instructions together. Avoid soaking or abrasive scrubbing unless both explicitly permit it. Repeated losses near a grip or cup holder may call for a different placement, not simply a stronger adhesive.
Manufacturer instructions to check
Reviewed November 13, 2026. Product formulations and labels can differ; the instructions for your exact product take priority.