How to bedazzle denim without gluing the pocket shut
Use a small glue-on motif on a flat denim panel. Prepare the fabric, separate its layers and leave seams and heavy bend areas clear.
Planning guidance, not a hands-on product test. Check the exact material, stone backing and manufacturer instructions before starting.
Before selecting a method
Read the garment care label and fiber composition. Stretch denim, coated denim and ordinary cotton denim may behave differently. This walkthrough uses non-hotfix flatbacks with a compatible embellishment adhesive. If you want hotfix, first follow the method-selection guide and the stone supplier’s textile application instructions.
A small first motif
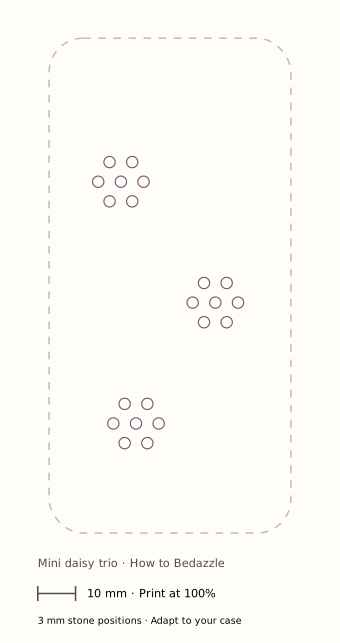
The three-daisy pattern contains 3 centers and 18 petals, all 3 mm. Prepare 4 center stones and 20 petal stones when allowing 10% spares per color. You also need a fabric-compatible adhesive, pickup tool, tray, ruler and an adhesive-compatible release barrier to separate layers.
1. Prepare and dry the denim
Follow the garment’s care label and the adhesive’s preparation instructions. Fabric preparation commonly includes removing sizing and avoiding fabric softener. Dry the garment fully and flatten the work area. Any pressing must respect the care label and happen before stones are attached.
2. Choose a panel that can lie flat
Start on the lower part of a patch pocket or a jacket panel away from buttons, seams and fold lines. Leave sitting, kneeling and belt-contact areas clear. If you decorate a pocket, place a suitable release barrier inside it so adhesive cannot join front and back. Avoid a porous insert that could itself become bonded.
3. Test the complete stack
Use a scrap of the same denim if available. Check for a visible wet patch, bleed-through, stiffness and backing damage after the adhesive fully cures. Also confirm that the barrier releases cleanly according to the adhesive instructions. Do not proceed with a test that bonds fabric layers together.
4. Dry-fit the flowers
Print the template at actual size and verify the 10 mm bar. Place the paper beside the garment as a reference; do not glue stones to the print. Set out each center and six petals on the fabric. View the layout while the garment lies naturally, without stretching it tight.
5. Attach one motif at a time
Follow your specific adhesive’s sequence; some products have a waiting stage before a stone is placed. Keep the barrier in position. Avoid pushing a flower into a thick glue puddle or spreading adhesive through an entire motif at once.
6. Separate wear readiness from wash readiness
Leave the garment flat for the labeled cure period, then inspect each stone. Read the separate laundering interval and washing method. A general “washable” claim does not mean every decorated denim item can go straight into a washing machine.
Check before every wash
Remove or repair loose stones before cleaning. Respect both garment and adhesive instructions; avoid direct ironing over stones. If a motif is stiff or repeatedly loosens when the fabric moves, simplify its placement or switch to a compatible attachment method rather than repeatedly applying glue.
Manufacturer instructions to check
Reviewed November 13, 2026. Product formulations and labels can differ; the instructions for your exact product take priority.